DIY Bangs
EMERGENCY USE ONLY!
Have you been tempted by DIY bangs? Probably, right? Well, keep reading.
DISCLAIMER: Never cut your own bangs under any circumstance! Cutting face framing fringes are for professional use only. You should never attempt them on your own, at home, all alone, with no one to stop you. Most stylists will trim them for free if you are a regular client, otherwise, the cost is very low and takes only a few minutes. Proceed with caution, at your own risk. Good Luck!
Now that I’ve gotten that out of the way, you should go back and read it again.
I have been in this business for a while now, almost 20 years. As a result I have seen almost all of my clients, that wear a bang, come in with DIY bangs. Even the ones that would sit in my chair and exclaim, “I would never cut them myself!” First of all, I can tell, no need to lie to me. Secondly, don’t be afraid to ask me, or whoever your stylist is, before doing something you can’t erase, like DIY bangs.
I know eventually you will try to trim your own bangs. Certainly, something will happen. The universe will be against you and you’ll just have to do it. I’ve already given a disclaimer, so you know how I feel about it. That said, I wrote this post as a guide for you to cut the length, let me repeat, the length only, and some direction. In no way will you ever see an advisory on how to texturize, shape, or personalize your fringes. That requires specific hand and body positions not attainable at home, with kitchen shears, in front of a dimly lit mirror. Seriously heed my warning above. However, if you absolutely can’t wait those extra two weeks, if you’re one of those twice a year clients, or if you’re drunk with friends, feeling dangerous and experimental, then this post is for you.
DIY Rules
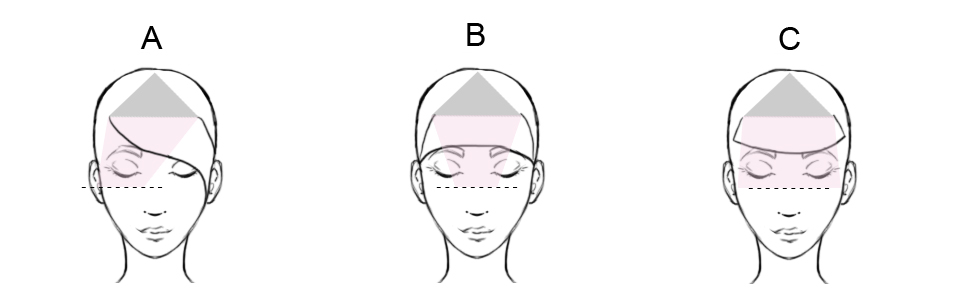
The diagram my daughter and I have created below should give you everything you need to know for DIY bangs.
First of all, the GRAY area in the graphic below represents the classic bang, or fringe area. It is a triangular section of hair starting at the high point of your forehead and expanding down to the outside corner of each eye. This will be the hair you hold and cut. Be careful not to take in hair from the hair line at the temples in this section. Now, clip the rest of your hair out of the way.
Secondly, the PINK area is where you will collect and hold the hair. Comb your hair with as little tension as possible. A light touch here goes a long way in avoiding mistakes. Hold your hair in the manner shown in the illustration as close to your skin as possible. Do not lift away from your face. Lifting will cause you unwanted texture and graduation. This is a dangerous game we are playing.
In figure A you can see the hair is moved (over-directed) to your right and collected over the right eye. Cutting the hair here will give movement in the opposite direction, making your bangs push to the left. This is for the side sweeping fringes we all love. You want it to go the other way? Just flip it!
In figure B you can see the hair is collected in the center of the nose and between the eyes. Cutting the hair here will give you the straight across look that wraps around your forehead and blends into the length.
In figure C you can see the hair is allowed to fall naturally and is slightly directed to both sides of the forehead. Cutting your hair here will give a more “mod” look to your fringe by encouraging it to bounce in the areas of recession. This is the most complex of all the examples, because it is the one most shaped by you. Above all, please be careful.
Straight and Steady…
Finally, the —–dotted line—– represents cutting a straight line, parallel to the floor. Yes, a straight cut line here will give you the curved shapes in the illustration. The shape of your hairline and head combined with the direction of your hair before cutting dictates all that movement. Now you’ll want to cut your bangs way longer than you want them. This will give you an opportunity to fix all the other mistakes you have just made. In case you were wondering, your first mistake was deciding to cut your own bangs. Repeat as necessary until you achieve your desired length.
OH, GREAT! Now that you’ve butchered your hair and need me to fix it for you, I expect to see you soon. We can have fun growing out and reshaping your fringe over the next few months. However, if you didn’t screw everything up, CONGRATULATIONS! In all seriousness, if you have had any luck with DIY bangs in the past, or as a result of this article, please tell us about it or even send us pictures! We love success stories.
Most importantly, thank you for reading, commenting, and sharing.